The slides of this video are shown below:
Slide 1

Welcome to the training course on IBM Scalable Architecture for Financial Reporting, or SAFR. This is module 4: Introduction to Lookups.
Slide 2

This module provides you with an overview of SAFR lookup processing. Upon completion of this module, you should be able to:
- Describe a typical SAFR lookup path
- Create a lookup path in the SAFR Workbench
- Include join data, using the lookup path in a view
- Update and run the SAFR Join phase JCL
- Interpret the results of join processing
Slide 3

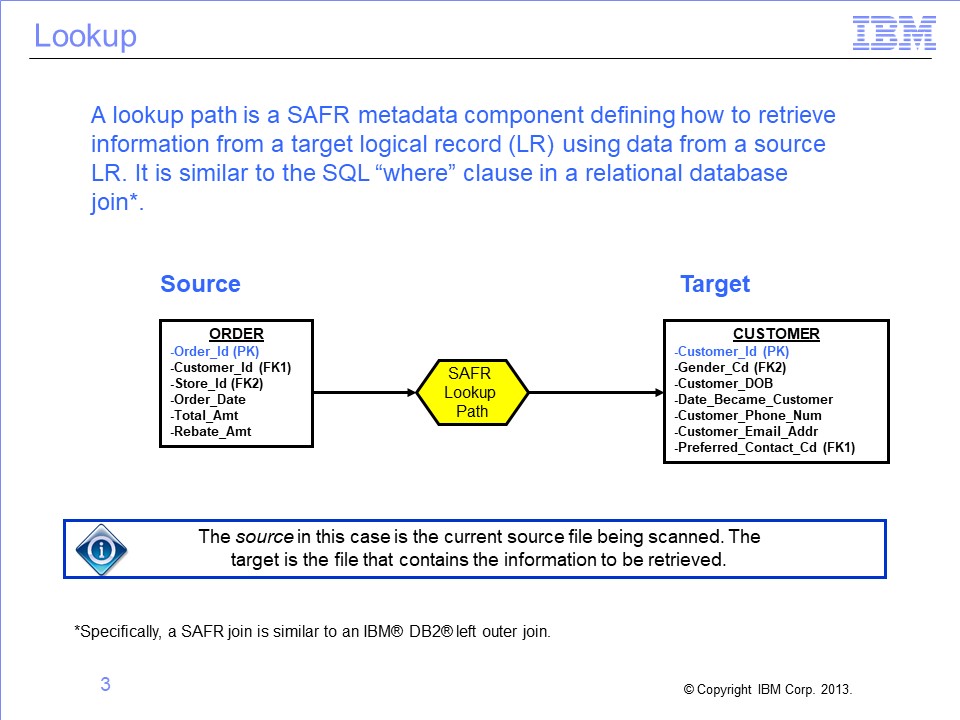
SAFR allows users to combine or “join” data together from different files for selection tests or inclusion in an output. This requires telling SAFR which data from the two files to match, the source, and the target. These files typically have different layouts, described by differing SAFR logical records, or LRs. SAFR requires these source and target relationships to be predefined in a SAFR lookup path. The lookup path is similar to an SQL “where” clause in a relational database.
Slide 4

Lookup paths can be used by many different views. To view existing lookup paths, click Lookup Paths in the Navigator pane and open a lookup path in the metadata list at the bottom of the screen.
To create a new lookup path, select Administration, then New, and then Lookup Path from the menu.
Slide 5

The General tab of the selected lookup path shows the lookup path ID, name, comments, and status, either active or inactive.
When you create a new lookup path, the lookup path ID is assigned by the Workbench and is not editable. It is used to make each lookup path unique and appears along with the lookup path name in views.
Slide 6

The name of the lookup path is visible when you are using it in views. When you name a lookup path, it is good practice to include the source-LR-to-target-LR mapping performed by the path. Also, if more than one lookup path in your environment is used to join the same source LR and target, you should add additional qualifiers to the name to provide uniqueness.
Slide 7

Lookup paths are created with an Inactive status and remain inactive until they are completely defined. They can then be activated, allowing for use in views.
If an active lookup path changes, all views referencing that lookup path are deactivated to prevent views from performing inaccurate joins. Select the Make Lookup Path Inactive check box to deactivate the lookup; this also deactivates all the views using the lookup path.
Slide 8

From the General tab, we’ve clicked the Lookup Path Definition tab, where we can select the source logical record and the target LR and its specific logical file. We can then select the source fields that should be used to create a key to search the target to find a matching record. The accumulated length of the source fields must equal the total key length before the lookup path can be activated and used for processing in a view.
Slide 9

The Source Field Properties area is displayed when the Selected Source Fields list is clicked. Here you can select a source field from the source logical record or specify a constant that should be used in the key. Constants can be either static, as shown here, or symbolic, which allows setting the value in the view when the lookup path is used. When specifying a constant, carefully consider the format of the target key when setting the format (data type), length, and so on.
We’ve now completed the lookup path. Next, we’ll see how to use it in the view.
Slide 10

On this slide, we’ve switched to the View Editor, creating a view that reads a file that is described by the Order LR. In column 3, we require a field that is on the Customer LR. After inserting the column, we select Lookup Field as the source for the column.
Slide 11

Next, the Lookup LR box lists all the LRs that can be accessed from the order LR, based upon the lookup paths that have been created. Because we created the Order to Customer lookup path, the Customer LR is available in the list.
Slide 12

Next, we select the lookup path that we want to use to perform the join. This is necessary because multiple methods of joining from one LR to another might exist. For example, the Order LR might have a Purchasing Customer ID field and a Ship to Customer ID field, and either of these might be used as the basis for a different lookup path to find the customer address. In this instance, we’ve selected the lookup path that we have just created, with a lookup ID of 3.
Slide 13

Finally, we select the actual field we want to place on the extract file. All the fields on the Customer LR are available for use. In this instance we’ve selected the customer email address to be put out on the extract file.
Note that the Column Source Value field is populated with Customer[7].Order_to_Customer[3].Customer_Email_Address[70]. This is the LR, path, field names, and IDs. This pattern is used in numerous places in the Workbench.
Slide 14

We’ve used the lookup path in the view, resulting in a join. Looked-up fields can be placed in output columns, used as sort and aggregation fields, or used in filtering processes or calculations using similar steps.
We’ve now completed the view. Next, we’ll see how to run it in the Performance Engine.
Slide 15

Recall from module 2 that the first step in running the Performance Engine is running MR86, which takes in the View List and the SAFR Metadata Repository and creates an XML file of the view.
Slide 16

The next program is GVBMR84, the COMPILE, which produces the MR84 VDP. The addition of join processing makes no significant changes to this process.
Slide 17

Next, MR90 is run. Because our view requires a lookup, two logic tables are produced. The Extract Logic Table (XLT) is used in the actual Extract phase as the view scans the Order file and performs joins to the Customer LR. The Join Logic Table, or JLT, on the other hand, simply prepares the Customer lookup file for use in the Extract phase.
The VDP tells MR90 that only the customer email address, the customer ID, and the join key are required for extract processing. The Join phase will use the JLT to extract only these two fields to be loaded into memory during the Extract phase processing to perform the joins.
Slide 18

The MR90 Control Report in the “Performance Engine Overview” module showed an empty JLT when no joins were performed in the view. Now the MR90 Control Report shows the JLT statistics and a printed version of the logic table.
Note that the view numbers listed in the JLT are run-time-only views for this execution of the Performance Engine. These example JLT views, 25 and 26, are never stored in the SAFR Metadata Repository
Slide 19

GVBMR95 produces two files in the Join phase. The RED file contains one row for every row in the input join file (in this example, the customer file), but only the fields required for extract processing. The REH file contains a single control record for each join file.
The following slides detail how to locate the DD name for the input join files for the Join phase GVBMR95 step and modify the JCL.
Slide 20

First, within the view, locate the lookup path used for any joins. For this example view, we are using the Order to Customer lookup path ID 3. The path name is highlighted on the slide.
Columns containing a joined field are highlighted with a Join icon to speed identification of required joins.
Slide 21

- Next, click the Lookup Path icon in the Navigator pane. A list of all paths is shown at the bottom of the screen.
- Select the path from the list. The Edit Lookup Path screen opens.
- Click the Lookup Path Definition tab.
- Note the target logical file defined for the lookup path. This value is used in the next step.
Slide 22

Next, locate the logical file by performing the following steps.
- First, select Logical Files in the Navigator pane and then select the appropriate logical file from the list of logical records.
- Next, find the associated physical file. The DD name is listed in the physical file definition, which we’ll find next.
Note that join files can be associated with only one physical file.
Slide 23

- Next, click the Physical File icon and select the specific file from the Associated Physical Files list.
- Last, locate the input DD name.
This DD name should be placed in the join file job for use by GVBMR95, as shown at the bottom of this slide. The DD name must point to the file containing customer data. Note that join files must be in sorted order by the key specified in the logical record. An error is issued in the Extract phase if the files are not in sorted order
Slide 24

After execution of the MR95 in the Join phase job, the MR95 Control Report shows the number of records read from the input Customer join file. It also shows how many records were written to the RED file (DD name GREF003) and the REH file (DD Name GREFREH). These files are then used in the Extract phase.
Slide 25

Following the Join phase execution of MR95, the Extract phase is run. Its inputs include the XLT, the REH and RED files, and the source or event file data (in this example, the Order file).
Slide 26

The Extract phase MR95 Control Report shows the processing of view 24 reading the Order file. Note that, on the same row showing how many records were extracted from the Order file (12), the control report also shows 10 lookups found (designated by the letter “F”) and 2 lookups not found (NF). This means two orders were associated with at least one customer ID on the Order file, which did not have corresponding customer records in the Customer file.
The report also shows that a total of 12 lookups were performed.
Slide 27

This module provided an introduction to lookups. Now that you have completed this module, you should be able to:
- Describe a typical SAFR lookup path
- Create a lookup path in the SAFR Workbench
- Include join data, using the lookup path in a view
- Update and run the SAFR Join phase JCL
- Interpret the results of join processing
Slide 28

Additional information about SAFR is available at the web addresses shown here.
Slide 29

Slide 30

This concludes the Module 4. Thank you for your participation.